IoT devices lack the resources for secure connections
It is not too difficult to run a webserver on an IoT (edge) device, even when the latter has few resources; any 8-bit microcontroller with a little bit of memory can do it. A client can then connect to the device and read or write data. However, letting an IoT device read data from or write to a server is much harder. The reason for this is that today most servers require secure connections. Small 8-bit MCUs just do not have the resources to make secure connections with certificates and encryption and the whole shabang. Offloading some tasks to a “helper” computer can be a solution in such situations.
Webpages can contain huge amounts of data
Another problem is that webpages can contain so much data that even if a small MCU system manages to establish a secure connection, it may simply not be able to handle all the data. Again, offloading some tasks to a helper computer can provide a solution.
Use a proxy to offload the IoT device
To illustrate the concept this project will use a helper computer to connect to a secure webserver, parse the data, extract the information the IoT edge device is interested in, and send it to it. Such a helper computer is generally known as a proxy server. The only difference with a proxy server is that in this project the proxy is a client of the IoT edge device instead of the inverse. We could call it a proxy client instead.
Example: extract a YouTube channel’s subscriber count
As an example, let’s extract the subscriber count from a YouTube channel and make this information available to an 8-bit microcontroller system in the shape of an Arduino Uno board. Most YouTube channels have rather static subscriber counts, but the popular ones (f.i. PewDiePie) change all the time. Such a channel allows you to draw a nice graph showing subscriber evolution 🙂
A proxy in Python
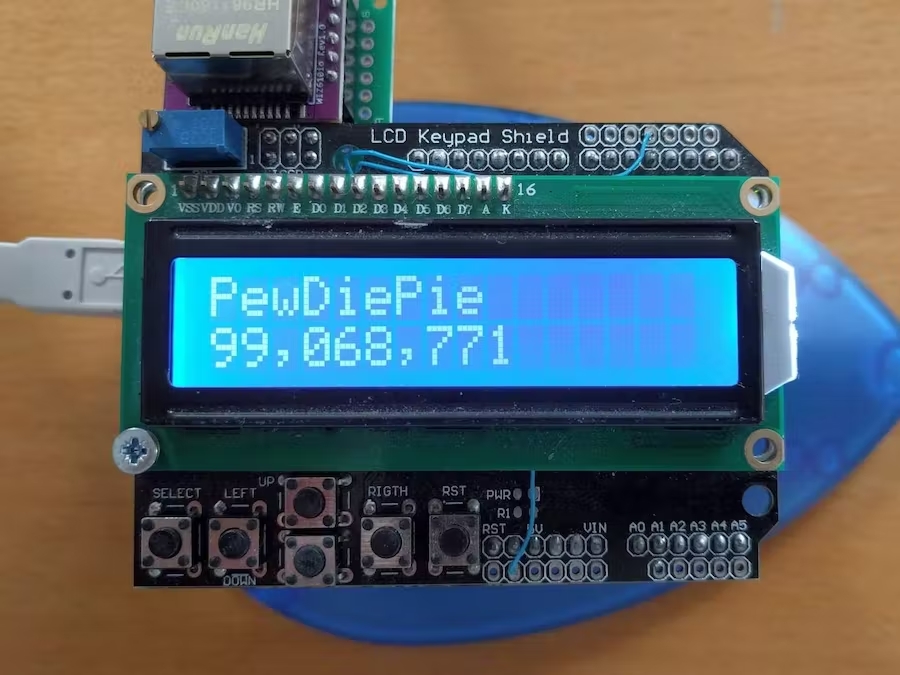
The proxy is implemented as a Python script that runs on a computer (PC, Raspberry Pi, other). It connects securely to YouTube and loads the desired channel’s homepage. From this it extracts the subscriber count and the channel’s name. It sends this data over wired Ethernet to an Arduino Uno extended for this purpose with a WIZnet WIZ610io network module. The Arduino Uno makes the data available as a simple webpage, but can also display it on, for instance, an LCD or log it to the serial port, or do something else with it.
Load the YouTube user page
To establish an HTTPS connection with YouTube in Python (v3 or higher) we can use urllib3. It handles all the certificate stuff and makes the connection transparent. To fetch the user page it is then enough to send an HTTP GET command with the URI of the page.
The URI for the YouTube page to fetch is defined at the top of the Python script.
Extract the channel name and subscriber count
A YouTube user page contains rather a lot of data, around 400 kilobytes. From this we only need a tiny amount, about 40 bytes or 0.01%. To find our needle in this haystack, we have to look for a unique tag. At the time of writing this was
yt-subscription-button-subscriber-count-branded-horizontalOf course, YouTube can decide to change this tag at any moment, breaking our program in the process.
Finding the tag is not enough, some extra scanning is needed to get to the data.
Furthermore, the data may contain multibyte unicode characters as thousands separators in the subscriber count. Because they can be anything depending on the language, we have to replace them by commas.
Two Python functions take care of the extraction of the channel’s name and subscriber count:
extract_channel_title(html)
extract_subscriber_count(html)
Send data with GET
An easy way to send data to a webserver is by adding it to the server’s URI and then issue a GET command. The server parses the received URI and extracts the parameters:
GET http://192.168.1.177/"PewDiePie"+"99,068,687"In this example the server is on the local network, as you can see, but it can be anywhere, of course.
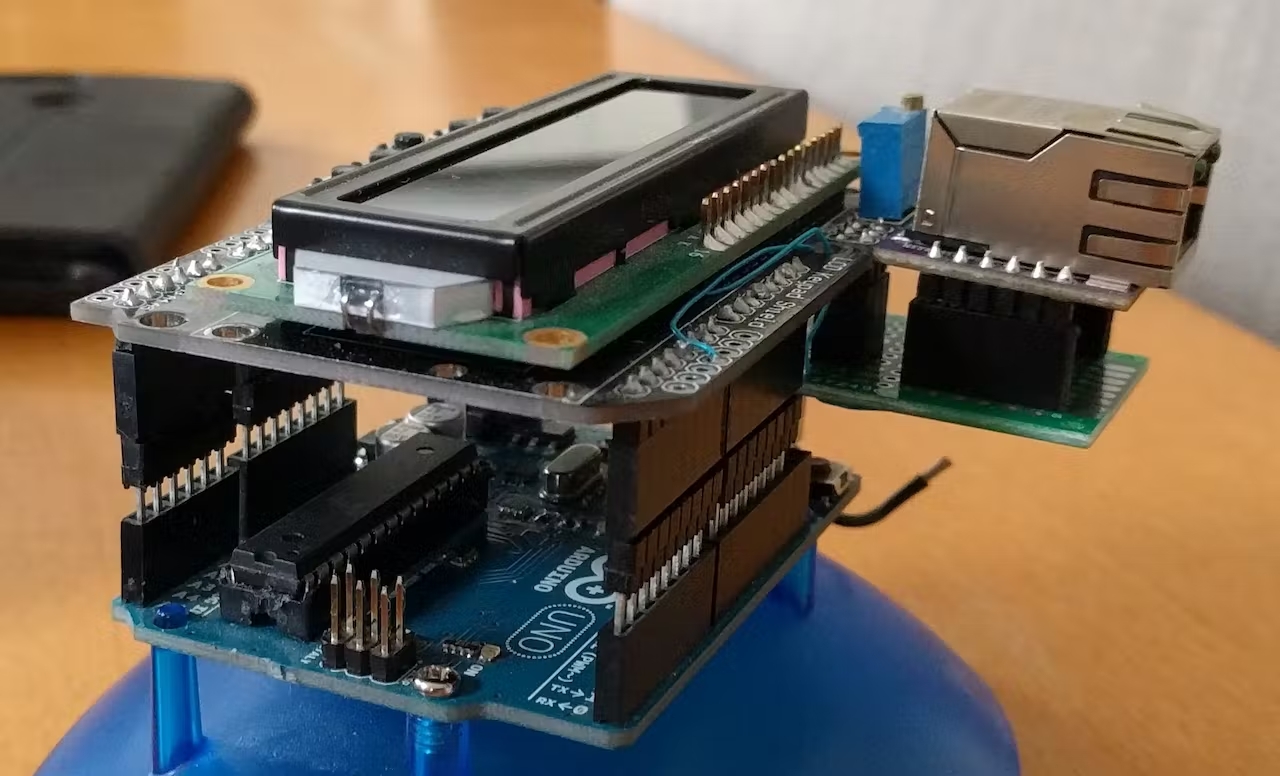
Arduino Uno as IoT webserver
To convert an Arduino Uno into a webserver it needs some sort of network connection like an Ethernet port. A WIZ610io module from WIZnet provides this here. Only four wires (not counting 3.3 volt and GND) are necessary to connect it to the SPI port.
Note that the WIZ610io User Manual Version 1.0 contains errors in the pin assignment drawings on page 4; the table on page 5 is correct though. Pin 1 of J2 is GND, not 3V3D. Pin 3 of J1 is MOSI, pin 6 of J2 is MISO.
Also note that the WIZ610io module must be powered from 3.3 volts. Its digital I/O is 5-volt tolerant, allowing direct connection to an Arduino Uno running from 5 V.
WIZnet has published an Arduino-compatible library for their module, making the creation of a suitable webserver a matter of adapting an example. The Ethernet-W6100 library replaces the original Arduino Ethernet library.
Displaying the data
As display I used an old LDC Keypad Shield that I had lying around. It is still available online, and I think that revision 2 of this shield will work too. The first line shows the YouTube channel’s name, the second the number of subscribers it has.
The LCD Keypad Shield uses Arduino pin 10 to control the LCD backlight. The Ethernet library wants this same pin as SPI SS signal. Since it is easier to modify software I adapted the library as there is no function to set the SS pin. I rather arbitrarily chose Arduino pin 3.
Compare multiple channels and log data to a CSV file
The final Python script loads every 30 seconds three YouTube pages: PewDiePie, T-Series and Lady Gaga. The Arduino Uno displays them one after the other. This allows you to compare them easily. Also, all data is logged to a CSV file for further analysis (if so desired).
Have fun!
Although I used this project to show how to get data from a YouTube user page, it can be applied to all sorts of data extraction from any website. The user is only limited by his or her imagination.
The source code for the YouTube Subscriber Monitor is on GitHub.